#web design example
Explore tagged Tumblr posts
Visit Tumblr Blog
Explore Tumblr blogs with no restrictions, modern design and the best experience.
Last Seen Tumblr Blogs


Fun Fact
69% of Tumblr users are millennials.
Text
The new Discord UI looks like ass. Like it's even worse than the last update. The text and icons are so small given how much space there is? It looks like an intern put it together in fucking Dreamweaver with no idea on how to space shit apart.
It's so stupid looking. Even the compact layout has so much pointless empty space between elements??
PLEASE hire a new designer it just looks horrible and I can't even communicate how/why.
#I haaaate tiny icons floating in empty space like that#nothing is aligned properly either like the message bar is floating on a higher point than the status bar#with wasted space beneath it for no reason#its been so long since the last time I took web design in college but I feel like this is an example of what not to do???#I hate that the channel name has so much wasted space and covers a good chunk of messages for literally no reason#why is the events button so big???#just I'm begging you please calm down with the padding it's not a fucking sports bra holy shiiiiit
6 notes
·
View notes
Text

Card Flip Animation Using CSS
#card flip animation#css animation examples#css animation tutorial#css animation effect#card flip effect#css card flip animation#css card design#html css#html5 css3#animation#codingflicks#web design#frontend#frontenddevelopment#learn to code
8 notes
·
View notes
Text
Responsive HTML Church Website
#responsive church website#responsive web design#html css#css flexbox examples#css flexbox website#css tutorial#css#webdesign#html#css3#divinector
3 notes
·
View notes
Text


Example GFX & new watermark
NF2U DM me for discord and/or more info
꒰͡ 𐙚 ͡꒱ GFX Comms open.
Base price : $12 USD / MOD: Paypal/Nitro/deco
Price varies according to the number of characters, complexity, and what it will be used for.
Any sets are 50% the base price, plus any additional payment..
#𓏵𓏵 ﹒ 0pxxel ⸝⸝#𓏵𓏵 ﹒ requests open ⸝⸝#𓏵𓏵 ﹒ graphics ⸝⸝#𓏵𓏵 ﹒ commissions ⸝⸝#𓏵𓏵 ﹒ graphics examples ⸝⸝#nf2u#gfx#tgcf gfx#alnst gfx#kusuriuri#kusuriuri gfx#muse dash#muse dash gfx#web graphics#graphic design#commissions open#gfx commission
2 notes
·
View notes
Text

Days 128 to 129
I have worked hard on my portfolio site and added some cool animations and tool tips. I have done lots of prettying up as well. Tomorrow I'll fully implement the contact page.
#self improvement#cosmickittytalk#codeblr#csharp programming#csharp#csharp is superior#girls who code#programming#coding challenge#blazor#blazor programming#blazor website development#javascript#html css#html5 css3#htmlcoding#html5#css3#css animation examples#css#web development#website#front end development#full stack developer#coding for a year#coding#website development#website design#website animation#animated website
13 notes
·
View notes
Text
hey everyone, I'm planning on doing a write up for my website about neocities accessibility sins (things like cursors not having pointer states), lmk if any of you have seen something that makes a website hard to understand or navigate
#my posts#neocities#websites#web design#accessibility#u can leave a reply here or send me an ask! nothing is off the table#a lot of the issues im gonna bring up are pretty minor#also i miiiight ask for examples of this if u can give them but if not its all good#im not here to start drama or tell ppl how to make their website#i just want to bring up some issues that people might not've thought about
13 notes
·
View notes
Text
if i started doing neocities/nekoweb site layout commissions are there people who would pay for that sort of thing
#i'd need to like. gather some screenshots for examples of my work i guess but#ftr im a graphic/web design student#neocities#nekoweb#i can make it mobile friendly too btw
1 note
·
View note
Text
One thing about going into academia is that you WILL become incredibly passionate about at least one really niche common error.
#for example: i have cursed myself with the knowledge of what makes a facet different from a filter#and now i keep seeing people call things filters when they are. in fact. facets.#does this matter at all to anyone outside of information studies and web design?#NO!#but if you're curious you can only select one filter per category at a time#whereas you can select multiple facets per category at the same time#to use ao3 as an example: character tags are a FACET. language is a FILTER.#ship tags are a FACET. work completion status is a FILTER.#okay love you byeeee#not yr#personal#school#academic research
0 notes
Text
SUSTAINABLE PRACTICES AND TOURISM DEVELOPMENT AT THE NATIONAL MUSEUM IBADAN AS A STUDY AREA
SUSTAINABLE PRACTICES AND TOURISM DEVELOPMENT AT THE NATIONAL MUSEUM IBADAN AS A STUDY AREA ABSTRACT This research explores the role of sustainable practices in tourism development, with a focus on the National Museum Ibadan, Nigeria. The study investigates the current sustainable practices at the museum, their impact on tourism development, the challenges faced in integrating sustainability, and…
#ai ml project topics#ai project topics for final year#any project topics#bank related project topics#banking related topics for project#bba 5th sem project topics#be project topics for computer engineering#best marketing project topics#best marketing topics for project#best research project topics#best topics for project report#bible project topics#biblical and theological project topics#brand awareness project topics#business ethics project topics#business research project topics#case study topics for project management#climate change project topics#computer science project topics in python#computer science project topics on web design#dbms mini project topics using sql#dbms project topics using sql#design thinking project topics#diversity project topics#easy marketing topics for project#examples of project proposal topics#finance internship project topics for mba#financial risk management project topics#good research project topics#good science project topics
0 notes
Text
Responsive Profile Card
#responsive profile card#profile card#css cards#responsive web design#html css#codenewbies#frontenddevelopment#html5 css3#css animation examples#pure css animation#css#css animation tutorial#frontend#css3
1 note
·
View note
Text


Javascript, parallax scrolling, single page web site prototype.
#parallax#javascript#frontend#html5#html5 css3#html css#code#web design#web developers#web development#website development#Lynn Stanikmas#animation#css3#css#css animation examples#html#ui ux development services#ui#ui ux design#uidesign#ux#user interface#design
1 note
·
View note
Text

Simple Web Layout Design
#codingflicks#html css#frontend#css#html#frontenddevelopment#css3#css animation examples#web layout design#webdesign#website design
4 notes
·
View notes
Text

Responsive Animated Web Layout
#animated web layout#animated website design#responsive web design#html css#divinector#css#frontenddevelopment#webdesign#html#css3#frontend#create a website#make a website#css layout#css animation examples#css animation tutorial#css tricks
3 notes
·
View notes
Text
How Any Professional Webpage Design Provider
Most distributors of fuel-saving devices know where to start every want to decide on a . It can be fairly confusing because there is quite a bit of technical knowledge that have to be for you to make everything work. Wanting to offer why many use web development services to support get their websites operational taking associated with someone else's expertise to obtain the job done. If you are thinking about using website development services, there are a few the things which you in order to be looking for.
Another thing not to put on your site as you progress forward making use of your Website development will be the use huge obstructing images in all pages and posts. These just distract the visitors and patrons from main core among the site you don't want that. Maintain decorations, photos and images to minimum and only used them when key.
Prior to hiring a Website design & Development designer/developer for the professional website project, make certain you ask the very best questions. Here are some associated with the associated with questions that the applicant must answer professionally.
youtube
Plan you site with good old fashioned pen and paper work - it also helps most targeted traffic to brainstorm a completely new sites requirements this way and if you want to more ideas appear that way.
Anytime you deal with someone and also ask a good of questions, note their demeanor, odor they answer to all your questions. Are they impatient? Do they sigh most or together with an impression that are usually frustrated because of your questions? Do they speak from a condescending ambience? Do they volunteer additional information? Are they friendly and pleasant to talk to?
Unfortunately, if you are designing with a development team right there to make suggestions, you might get the "we can't do that" response an individual hand over your designs to a developer. Also, if you're using a pre-built cart while Volusion as well as other popular cart software, there will be limitations to customized for specific cultures and complexity of template customization. For anybody who is part of a particular talented development team, when possible have no issues since can direct you pay day loans designing for your client. Overall, the main thing bear in mind is that the direction has to be mindful of e commerce Website design standards.
Due to these parameters by simply people to define attractiveness of the website, websites completely dependant upon flash are liked the most irrespective on the usability and indexing issues in search engines. Therefore, it incredibly necessary realize that can be a good design? Individuals when sites were built only for the human eyes, a good website design incorporates all of the features in which human visitors as well as robots or crawlers fall in love with many of the. Although sites are still and usually be developed for the human visitors but in the present time of stiff competition and exhaustive marketing strategies the competitors make it imperative to for everyone to incorporate the necessary parameters which makes the webpage design good for that robots likewise.
Weight reduction . just a Saloon POS system bit of the website services within your budget by premier online service companies. If you'd like a useful website payment faster return of investment, getting an agent to a person to is an intelligent move.
0 notes
Text
How to Make Your Own Binder that Fits Well and Looks Good
A while back I was in need of some new binders and thought hey, I bet I can make one way cheaper than buying it from somewhere (especially cus some of the ones I’ve bought in the past didn’t really fit right). Except when I started looking for a binder patterns online, I was very surprised that I really… couldn’t find many that looked very nice lol. Most of them had really wrinkled necklines, or didn't bind well, or just overall looked weird. A lot of the patterns also required a serger, which I don't have.
So I just said fuck it and made my own pattern! And it ended up being relatively easy! And the binders fit REALLY WELL and are comfortable to wear, even for long periods. The neckline doesn't show under shirts with loose collars, and the bottom hem doesn't gap or stick out. Here's me wearing one:
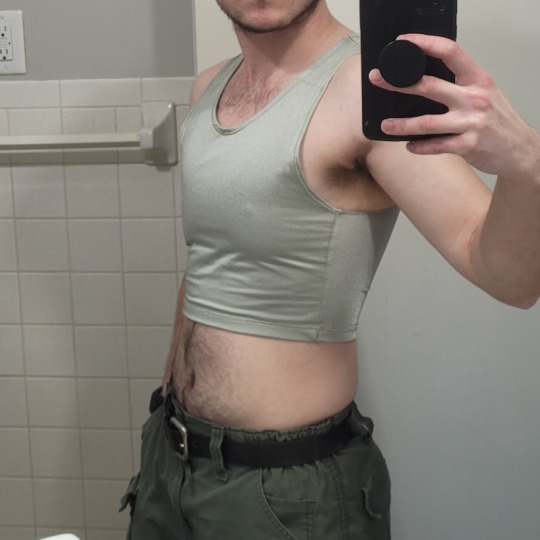
(plus I was able to make myself 5 of them for a total of like ~$50.)
So I figured I could throw together a guide to help out anyone else who wanted to make their own binder but was dissatisfied with the patterns available!
Disclaimer: This tutorial is going to assume a baseline level of sewing experience, and also will require access to a sewing machine. It is not a complicated pattern, but it will most likely require some tweaking and adjustments after you make the first one. Don’t be afraid to make alterations to make it fit better!
This tutorial is for a gc2b-style half-tank binder. It could be altered to be a full-tank binder, but all instructions will be for the half-tank design.
Materials needed:
Stretchy fabric, probably listed as 'athletic fabric' (I use this kind from Joann’s. Most athletic stretch fabrics should work, look for around 80% nylon/20% spandex blends)
Stiff fabric (I use this shirting cotton because I like how lightweight it is. If you want something a little stiffer with more structure, you can use a cotton or cotton/poly blend twill like this. gc2b binders use twill for theirs.)
Lightweight fusible interfacing (I use this kind) (get FUSIBLE not sew-in)
Fusible webbing like Pellon Wonder-Web (this is technically optional but it WILL make your life easier when you’re sewing - just make sure to get the kind with the paper backing!!!)
“But kiwisoap thats 4 whole kinds of materials, surely I don’t need that many!” Ok sure, you can probably get by without the fusible web and interfacing, but consider: they are both dirt cheap (im talking like $1-2/yard), they will make it much easier to sew the final product, and will give you an overall better-looking result. This tutorial is written with the assumption that you’ll use them.
"How much fabric will I need?" Measure the circumference of your chest below your armpits. Add 6 inches just to be safe. This is the yardage of stretch fabric you’ll need, and should give you enough material to make at least 3 binders without much excess left over. You will need around half as much stiff fabric.
Other supplies:
Big Paper (for drawing the pattern)
Flexible measuring tape
Sewing machine
Iron
Pins
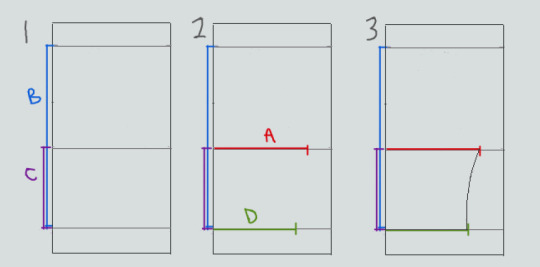
Step 1: Measuring
You will need 4 main measurements for this pattern.

A) Measure the circumference of your chest just below your armpits, then divide the number in half. This will be the widest part of the pattern.
B) Measure from the top of your shoulder down to where you want the binder to end. For most folks, this will usually be around the natural waist (narrowest part of the torso), about 3-6 inches above the belly button. This will be the overall height of the pattern.
C) Measure the distance from below your armpit to where you want the binder to end. This will determine where the arm hole starts.
D) Measure the circumference of your waist where you want the binder to end, then divide the number in half.
So for example, after dividing A and D in half, my measurements are 17", 15", 7", and 14.5".
Next:
Subtract one inch from measurement A - This will help provide some compression. You might need to take it in even further depending on how it fits, but one inch is a safe starting point. I take mine in around 1.5 inches.
Subtract half an inch from measurement D. This will help prevent the bottom edge of the binder from gapping. Again, you may need to take it in more or less, depending on your own body.
Add 1.5 inches to measurement B and one inch to measurement C. This is to account for the hems and armhole placement.
This makes my final measurements
A = 16"
B = 16.5"
C = 8"
D = 13.5"
From here on out, we are only going to be working with the measurements that we have added/subtracted to, NOT the ones we initially took.
Step 2: Drawing the Pattern
You will need a piece of paper large enough to accommodate the entire pattern. This may involve taping multiple pieces together, or using a piece of newsprint, etc.
I recommend folding the paper in half to ensure that you get a symmetrical pattern. However, this means you will need to divide measurements A and D in half again, or else you’ll end up with a pattern that’s twice as wide as it should be!
Also note: the pattern is drawn with the seam allowance built in! You don’t need to add any seam allowance.
To draw the pattern:

Begin with your folded paper. Measure and mark B and C on the paper, and draw a line extending across the paper. These will be your guidelines.
Measure and mark A and D along the middle and bottom guidelines, respectively. Remember, the paper is folded, so you only use half of the measurement for A and D.
Draw a loose curve connecting the endpoints of A and D. If needed, you can also just draw a straight line between the two.
Mark the opening for the neck hole. Depending on your size, it will measure around 6-8 inches across at the top (remember to divide this in half for the folded paper) and about 5-6.5 inches deep. (mine is 6.5" across and 5.5" deep) Draw a curve to connect the two points. This part will take some tweaking and adjusting to get it to look right lol.
Measure the width of the strap - this should be somewhere between 2.5 - 4 inches wide. They will end up about 1/2” to 3/4” narrower once you sew them. Draw the line at a slight angle, as shown.
Connect the endpoint of the strap to the endpoint of line A with a curve like in the diagram.
This will be the pattern for the front piece.
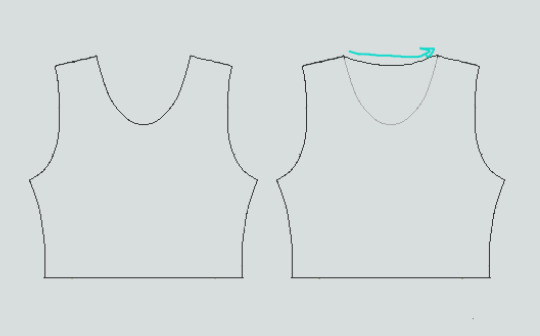
To make the back piece, trace the front pattern, but make a very shallow curve for the neckline instead of a steep one, as shown:
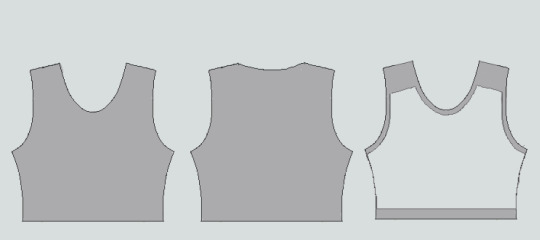
The last piece is the stiff front panel. This is what provides the flattening effect of the binder. To make the pattern, trace the front pattern again. Trim 3/8” in on the sleeves and neckline, and 3/4” to 1” along the bottom. This gives a flatter hem. Then trim the straps shorter by a few inches. This helps the binder lay flatter along the shoulders.
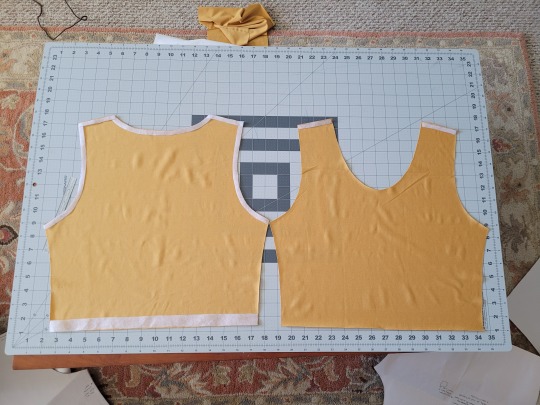
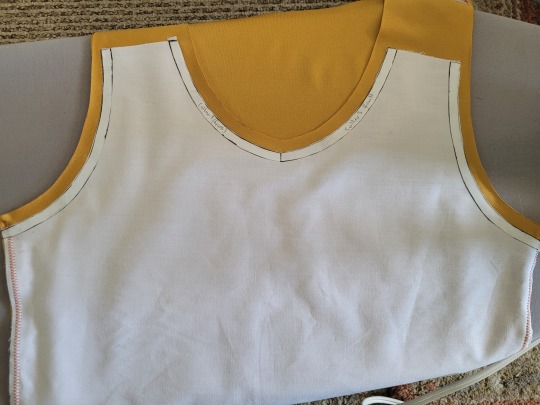
When you're done, you should have 3 pattern pieces that look approximately like this (stiff panel shown overlaid on the stretch fabric to show how it fits together).
NOTE: If you want more compression or just want to make it a bit sturdier, you can add a second panel of stretch fabric to the back piece. Just use the bottom half of the back pattern (from the widest part down to the bottom hem) to cut out another piece of stretch fabric. Attach it to the back piece with a strip of fusible webbing and a zig-zag stitch along the top.
Step 3: Putting It All Together
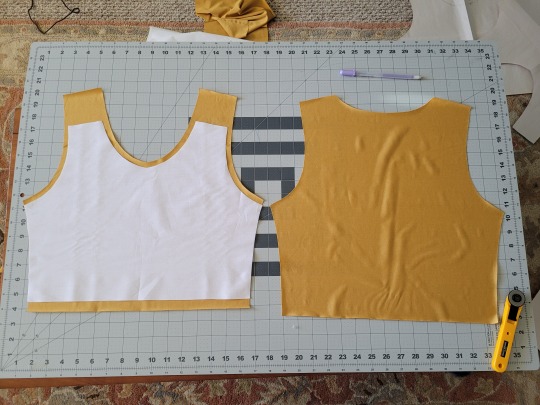
Once you’ve made the patterns and cut out the pieces of fabric, you should have something that looks like this:
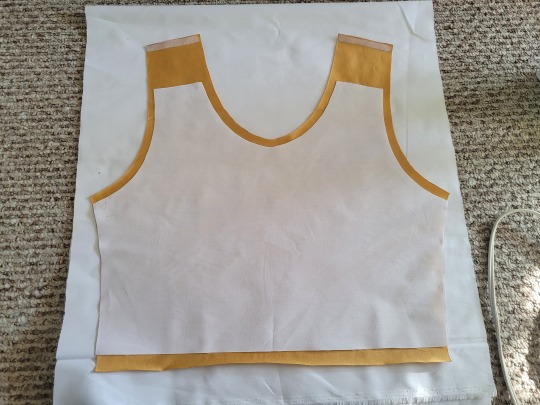
The next step is adding interfacing and fusible webbing. Use your pattern to cut out 3/8" strips to fit on the top of the straps for both pieces, and to the neckline, sleeves, and bottom hem of the back piece, as shown:
If you want to add it to the bottom hem of the front piece, it will help keep that hem flat when sewing it down later, but it's not essential.
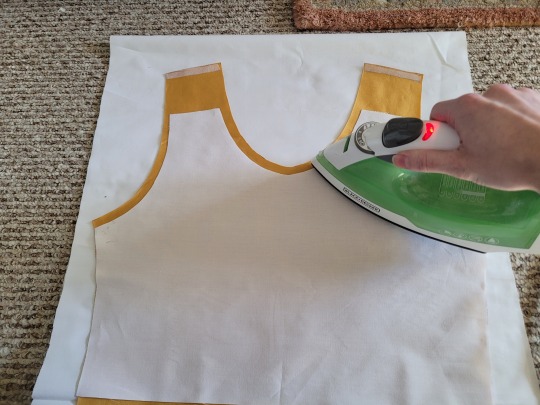
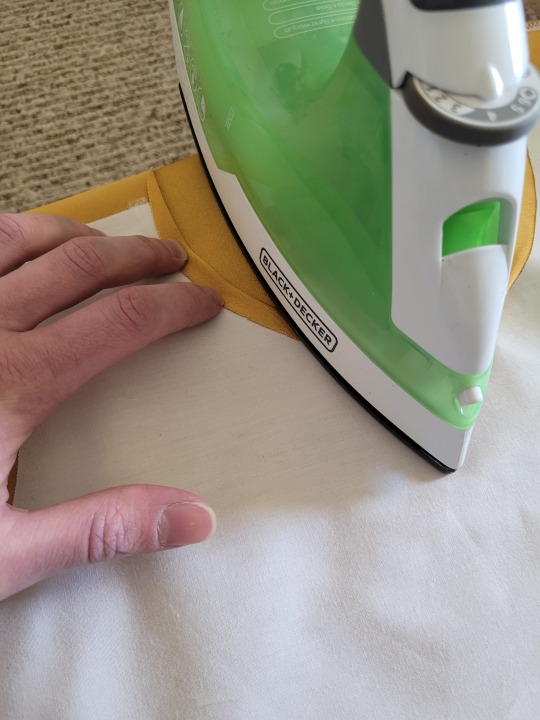
If you choose to also use fusible webbing (WHICH I RECOMMEND), you will apply it to the stiff front panel similarly to how the interfacing was applied, ~3/8” strips along the neckline, sleeves, and top of the straps. Cut out two strips for the neckline and sleeves, because we'll use those later too.
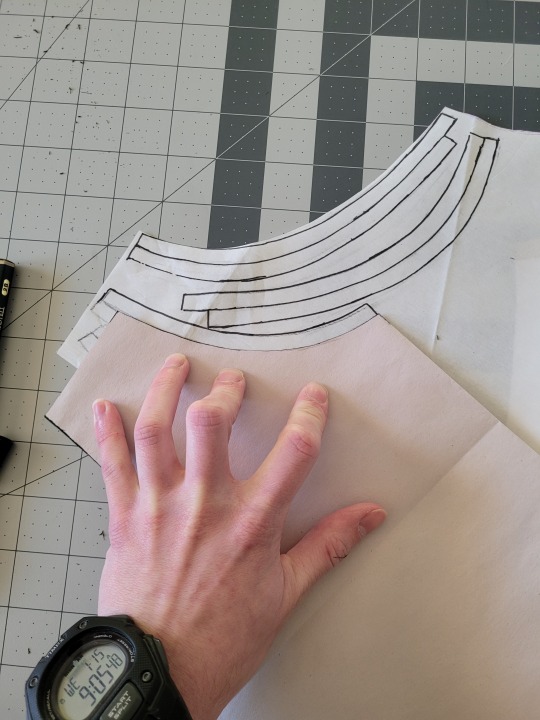
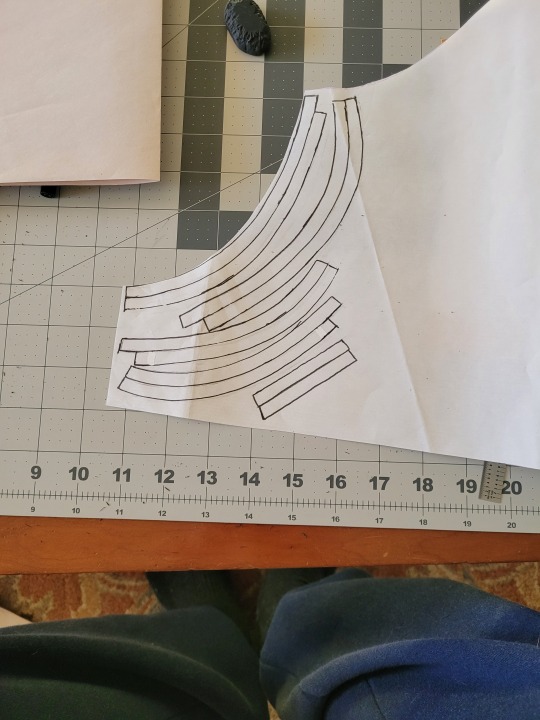
Iron the strips onto the front panel as shown:

Once it's on, just peel off the paper, position it webbing-side down on the stretch fabric, and iron it to fuse the two pieces together so everything stays in place while you sew. THIS MAKES IT WAY EASIER TO SEW.
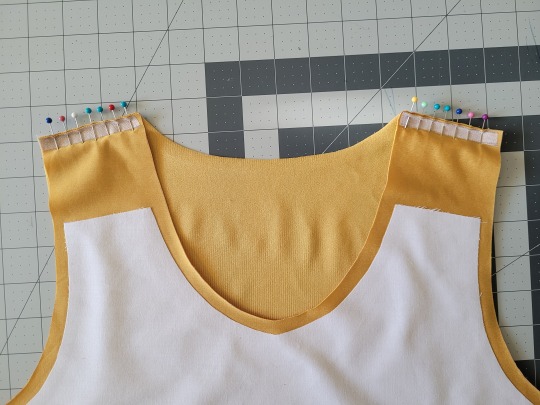
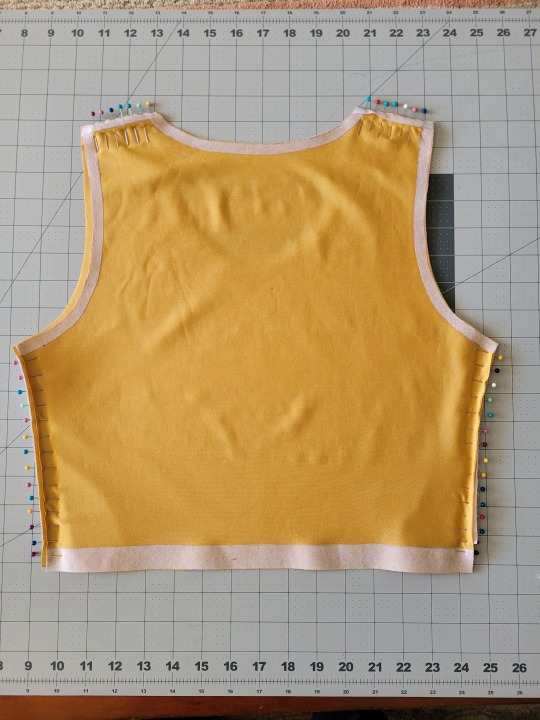
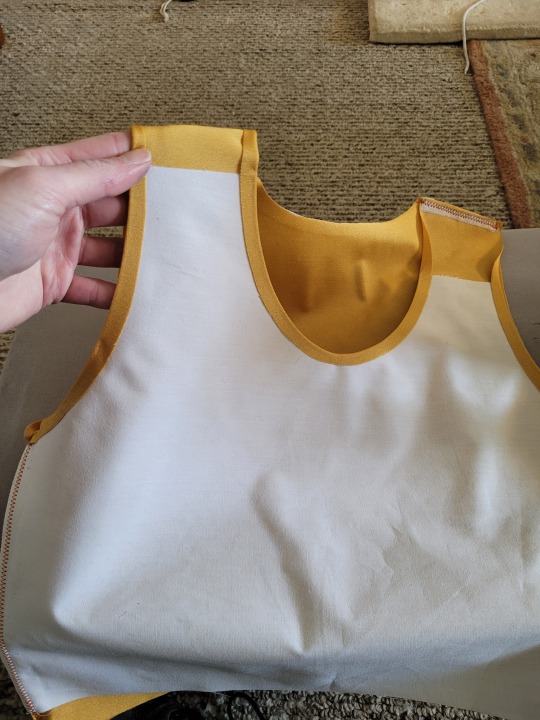
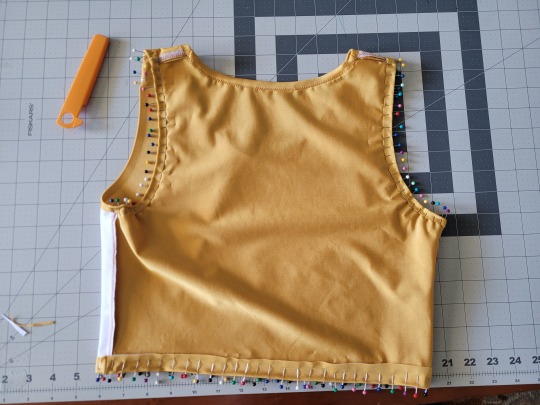
After the stiff front panel is fused to the stretch fabric, you’ll sew the straps of the front and back pieces together, then join the pieces along the sides. Pin the hell out of it to keep everything in place -this type of material is VERY prone to puckering.
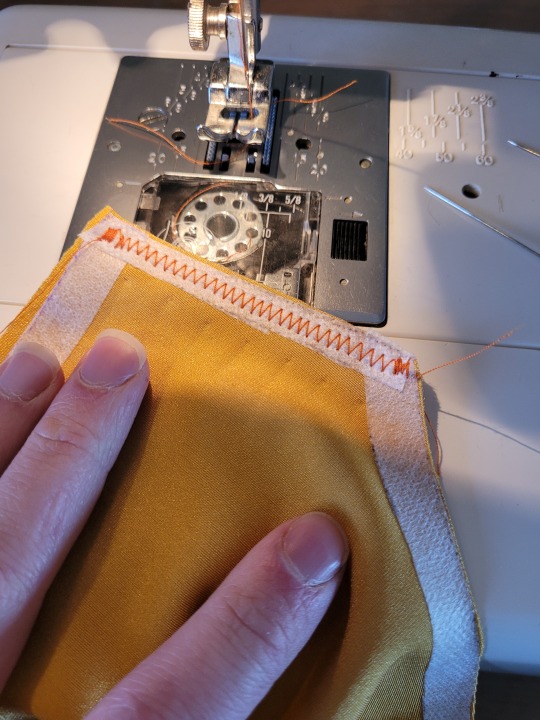
When sewing, USE A ZIGZAG STITCH. A straight stitch will NOT WORK for stretch fabric. I adjust mine to 1.3mm long and 3.5mm wide which has worked well. If your machine doesn’t let you adjust stitch length or width, well. That sucks, I don’t really have any advice.
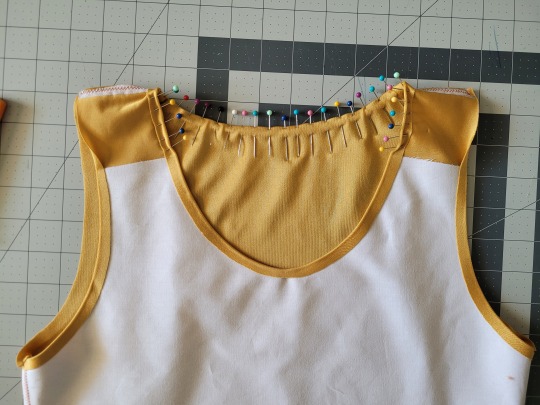
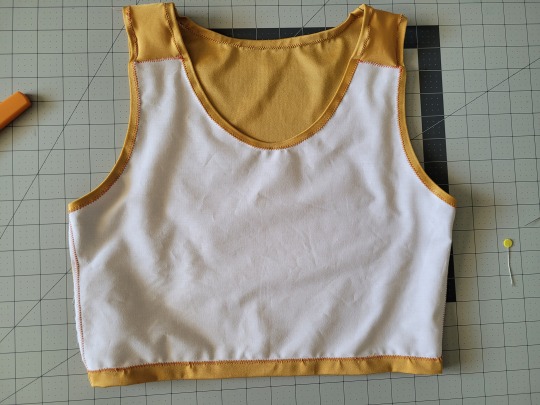
After you sew the front and back pieces together, you can add more fusible webbing to the front panel to help hold the hem down flat and prevent it from puckering while you sew it. Just add the strip, peel the paper off, then fold the hem over and iron it down. This part isn’t really necessary, but it does make the hems look nicer. If nothing else, I would recommend adding it to the neckline.
After that, you just fold & pin all the hems and sew them up with a zigzag stitch, then go over the raw edge at the top of the stiff panel (where we cut the straps shorter).
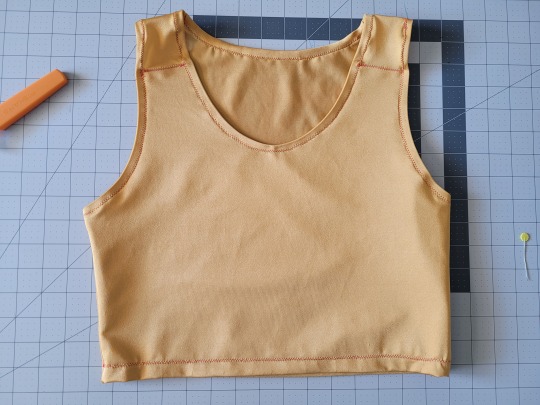
And that’s it! You’re done! And now you can make your own binders whenever you want!
And hey! If you used this tutorial and wanna throw me a dollar or two on ko-fi, I wouldn't complain.
2K notes
·
View notes